At this opportunity, I will share you how to reset your Epson printer...
Follow the step bellow:
1. Download SSC Service Utility here!
2. Install SSC Service Utility
3. Click Configuration tab
4. Fill Installed Printers with printer which the driver has been installed
5. Fill Printer Model with the appropriate printer, for special model like CX5100 you can change by the equivalent model CX5200
6. Select "Disable Epson Status Agent" and "Start Utility Windows at Startup"
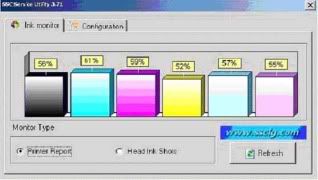
7. On Ink Monitor tab, click refresh and then check whether ink volume is seen like this. If not or more than 100% it means that your printer is not recognized. Remove you printer driver, re-install again until your printer can be recognized.
9. Right click on this icon, start with the functions
10. "Protection Counter" is most usefull function. When you have printed until reach certaint numbers you will know a notice that indicate, "the component have reached its life span". It make both of the lamp blinked. The actual condition is not like that, printer components can be used for a long time but EPSON has setup a "Printing Paper Record Utility" on the main board. Click "Protection Counter" and choose "Reset protection counter" to clear the records.
11. Click "Yes" when there a confirm box
12. Then click "OK". The waste counter is resetted
13. The last, turn off printer and switch it back on again. You have finished the "SSC Procedure"


No comments:
Post a Comment